

[ Home | Library | Contents ]


[ Prev | Next ]

by David Dunham
 I know this article is supposed to be about creating a Harry level, but due to technical difficulties (read: poor time management on my part ;-() I haven't had time to do justice to this process. I created a level, but covering all the bases in an article is just too much to add to my already precarious balancing act. My apologies to the Harry fans out there.
So, this week I'm going to cover an issue I've had to address via email a few times in the recent past. Many users have written requesting that Snapz Pro allow them to save images to whatever folder they want, wherever they want. Snapz Pro is a control panel, and it's my understanding it's limited as to where it can save files, but, I can show you a trick to get around this.
The Mac OS allows a user to make an alias of any file. This alias serves as a pointer to the original file. Snapz Pro already uses aliases, the Screen Snapz folder in the Apple Menu is an alias of the Screen Snapz folder in the system folder. The trick I'm about to show you takes advantage of this feature.

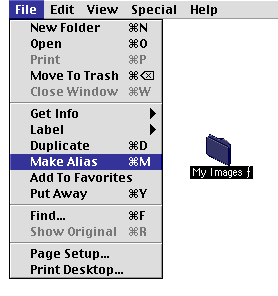
The first step in our little scheme is to create your folder, anywhere you like, named anything you like. For this article we'll call it "My Images ". Make an alias of this folder (go to the File Menu to Make Alias, or use the "command M" keys), rename the alias "Screen Snapz". Place the alias in the system folder, you'll have to trash the Screen Snapz folder that's already there. Then make an alias of the Screen Snapz alias. Place it in the Apple Menu Items folder and rename this alias "Screen Snapz". Pheww, my folders are having an identity crisis with all of these aliases, so let's review, you now have a folder named "My Images ", you have an alias of this folder named "Screen Snapz" in the system folder, and an alias of this alias, also named "Screen Snapz", in the Apple Menu Items folder.
Now go ahead and invoke Snapz Pro. Voila, your image is written to the Screen Snapz folder in the system folder, but this is an alias of the "My Images " folder, so your image is saved in the "My Images " and can be accessed via the Apple Menu.
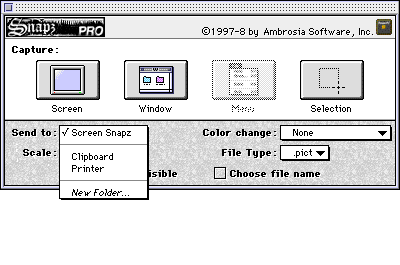
 When I have a project to do, I find that for whatever reason I may want to edit some of them in one application and others in a different one, or maybe save some as gifs and others as jpegs. Snapz Pro allows you to organize these files easily and quickly. When you invoke SP, in the capture tool palette there is an option called "Send To:" Select the "New Folder" option. Name it accordingly (gifs, Photoshop, web images...). Create as many folders as you like. Whenever SP is invoked, these folders will be listed in the Send To menu. Now, using my trick and SP's handy capture pallette, you have all of your images saved in their appropriate folders, available immediately, anywhere you like.


[ Prev | Home | Library | Contents | Next ]
Copyright ©1995-8 by Ambrosia Software, Inc. - All rights reserved

 I know this article is supposed to be about creating a Harry level, but due to technical difficulties (read: poor time management on my part ;-() I haven't had time to do justice to this process. I created a level, but covering all the bases in an article is just too much to add to my already precarious balancing act. My apologies to the Harry fans out there.
